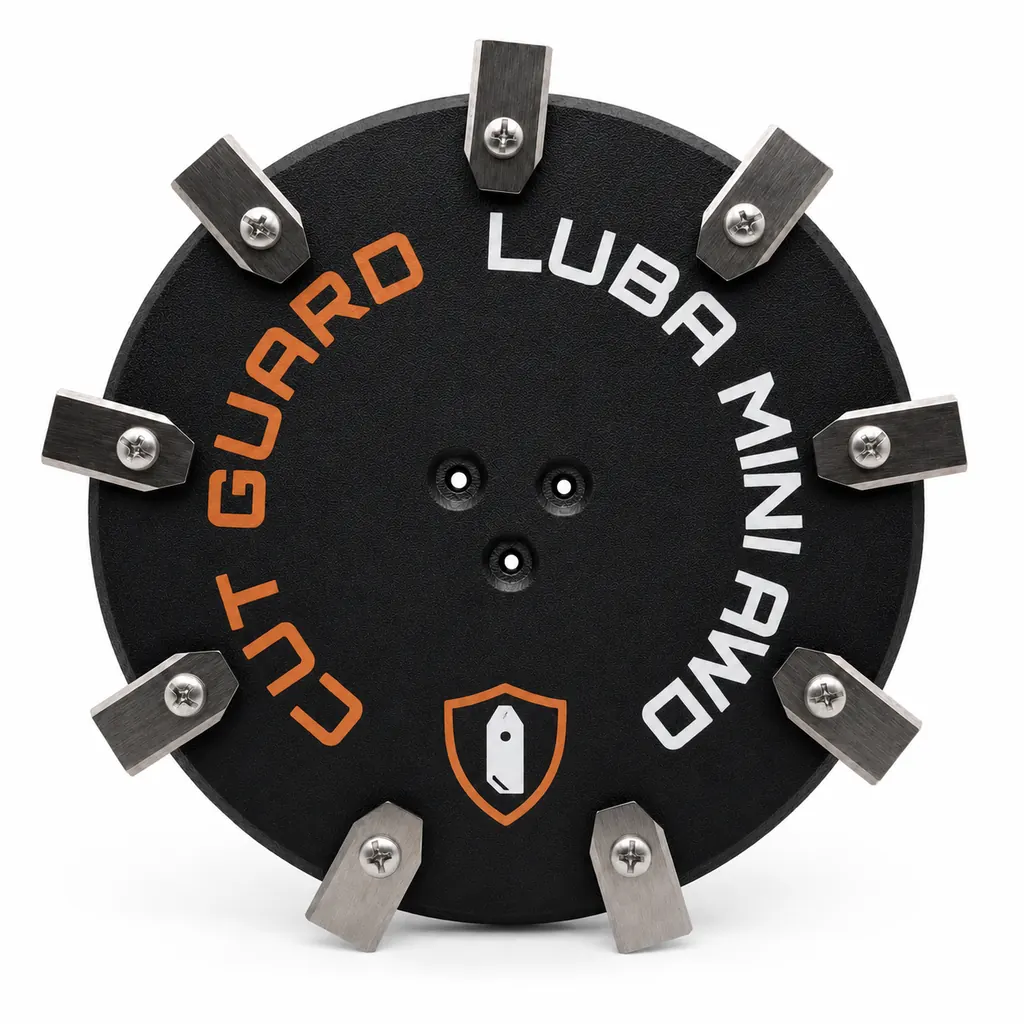
The lawn mower robot drives as usual, but the lawn suddenly looks gray, ragged, or at the tips light brown? In many cases, it’s not navigation, not the app, and not the motor—rather, dull, stuck, or poorly fitting blades on the cutting disc.

Many users report exactly this frustration: After a few weeks, the cut starts to look uneven, individual blades of grass remain standing, the small pivoting blades get stuck with grass residue, or the screws are barely able to be loosened during replacement. It gets especially confusing when the question then comes up: Are 3 blades enough, is 6 better—or is a 9-blade cutting disc worth it right away?
Messerscheiben24 manufactures and tests CUT GUARD cutting discs as accessories and spare parts for robotic lawn mowers—not for classic lawn mowers and not for new robotic lawn mower units. The range includes cutting discs, mowing discs, and replacement blades for Segway Navimow, Mammotion, Dreame, MOVA, eufy, Ecovacs, Gardena, Husqvarna, WORX, TerraMow, Sunseeker, ANTHBOT, and other models. If you want to check first which solutions are generally available, you’ll find an early good overview of cutting discs for robotic lawn mowers by brand and model.
Switching the cutting disc or blades – what’s the difference?
The blade is the wear part. It cuts grass, damp blades, small clumps of soil, sand, twigs, lawn edges, and sometimes, unfortunately, even stones or toys. That’s why it becomes dull, develops notches, or—worst case—breaks. The cutting disc—depending on the manufacturer also called mowing disc, blade holder, or Blade Disc—is, on the other hand, the carrier to which the blades are attached.
In practice, you therefore shouldn’t automatically replace the entire cutting disc every time you change the blades. For a normal maintenance appointment, it’s usually enough to replace all blades and screws, clean the disc, and check for clearance. For Navimow and CUT GUARD users, it makes sense to keep a supply of compatible replacement blades with screws if the robot runs several times per week or the garden has many edges and narrow spots.

The complete cutting disc only becomes an issue once it is visibly damaged. Typical reasons include cracks, stripped threads, worn blade plate mounts, grinding marks on the housing, imbalance, a wobbling run, or blades that can no longer be securely fastened. In forums, this exact point is often discussed: After contact with concrete, stone, or a lawn edge, it’s not only the blades that become dull, but also individual mounts on the disc.
A good workshop check looks like this: Switch off the robot, follow the instructions for battery safety, wear gloves, clean the mowing disc, check every mount, and move the blade slightly. It must sit securely, but it must not be clamped tight. If the blade can’t swing freely, it cuts worse—even if the cutting edge still looks sharp.
Workshop reminder: Replace blades regularly; replace the cutting disc only in case of defects, imbalance, cracks, or damaged mounts.
3, 5, 6 or 9 blades: When a higher blade count really makes sense
More blades initially sound like a better cut. But it’s not that simple. User reports often mention that 6-blade or 9-blade discs provide a more even result, especially with heavy growth, faster driving mode, or dense grass. At the same time, other users report just as correctly: If 3 clean, sharp blades are enough, using 6 blades also doubles maintenance and blade costs.

The number of blades does not determine the result on its own. The cutting height, driving speed, lawn density, moisture, mowing disc diameter, the distance of the blade to the disc, and the question of whether the blades truly swing freely all matter. A 9-blade disc with poor clearance can work worse than a clean 3-blade mowing disc with fresh blades.
| Number of blades | Suitable for | Strengths | What to watch out for? |
|---|---|---|---|
| 3 blades | Many standard gardens, regular mowing, few obstacles | Low maintenance, low cost, often sufficient | Check the cut pattern; dull 3 blades won’t produce a clean cut |
| 5 blades | Models designed for this mowing disc, often larger or professional systems | More cutting contacts per revolution, possibly a calmer cut pattern | Only use if the mowing disc and robot are intended for it |
| 6 blades | Dense lawns, stronger growth, users with an uneven cut pattern | Often visibly more even, fewer blades standing up | More cleaning, more screws, more blade wear |
| 7 blades | Special accessory discs, if the setup and clearance fit | A compromise between multi-blade cutting and moderate maintenance effort | Check fit for each model carefully |
| 9 blades | Gardens with high demands on the cut pattern, large areas, strong growth | Many cutting contacts, possibly a cleaner cut pattern | Take fit, power consumption, imbalance, and cleaning effort seriously |
For Segway Navimow H models, a multi-blade conversion can be worthwhile if the lawn still looks uneven despite fresh blades, or if the robot needs to do more work in short mowing windows. Then it’s worth taking a look at a 9-blade cutting disc for the Navimow H series, as long as the model generation and mounting really do match.
With Mammotion LUBA with two cutting areas, there’s also a practical point: you don’t just replace one disc. If you want to service both sides at the same time, you can avoid later double work by using a suitable 2-piece set for LUBA AWD and checking both mowing discs in one go.
More blades are especially worth it when the garden is the cause of the problem: dense growth, short mowing windows, fast drives, or many blades that get stuck. For simple lawns, fresh 3 blades are often the more sensible solution.
How often do you really need to change robotic mower blades?
A fixed number of hours rarely fits every garden. Many users report changing after about 40 to 45 mowing hours, when the first mowing passes went over soil, sand, stones, or uneven edges. Others follow app recommendations, replacing after 80 to 160 hours or only once or twice per season. Both can be correct—if the garden fits.
In practice, we recommend: check every 4 to 8 weeks, and don’t switch blindly according to the calendar. With a small, clean, obstacle-light garden, Klingen last significantly longer than on an area with molehill mounds, sand, fallen fruit, roots, lawn edges, and damp corners. Especially right after the first start of the season, Klingen are often worn down faster, because branches, soil, and winter debris are still lying in the lawn.
A dull Messer is not only recognizable by the blade itself. The lawn shows it earlier: frayed tips, light or gray cutting edges, brown blades, laid-over grass instead of a clean cut, individual “stragglers,” and an overall rough appearance. In forums, people often complain that the lawn looks dull after just a few passes—sometimes, however, it’s not due to poor Klingen quality, but because of dirt, stones, or a cutting height that’s set too low.
If you want to go deeper, you’ll find additional tips on cutting pattern, replacement rhythm, and typical fitment questions for CUT GUARD and Segway Navimow in the practice guide to replacement blades.
Which cutting disc fits which robotic mower?
“Fits for brand X” isn’t enough. That’s one of the most common mistakes when buying accessories. Within a brand, model generations, disc mounting, screws, blade shape, direction of rotation, and housing clearance can differ. With newer model lines, firmware and equipment variations also come into play—where users only notice after a few weeks where blades, edge mowing, return travel, and cleaning really cause problems.
Before purchasing, you should therefore not only check the brand name, but also the type plate, the exact model designation, year of manufacture, app model, the existing cutting disc, and the screw type. Especially with Mammotion, it’s also worth comparing with model series and area classes; as a guide, an detailed Mammotion model comparison can help you correctly classify your own LUBA or YUKA variant.
Fit check by brand and model series
| Brand / Series | Typical garden situation | Strengths from a user perspective | Blade wear & fit |
|---|---|---|---|
| Segway Navimow i / H / X | Wireless gardens, often multiple zones, edges and app areas | Quieter operation, clean mowing with good setup | Pay attention to hole pattern, screws, clearance and model generation; grass clippings can block the blades |
| Mammotion LUBA / YUKA | Larger areas, slopes, complex zones, sometimes AWD | Strong traction, high area performance | When using dual-disc setups, service both sides evenly; third-party blades only with the correct thickness and safety features |
| Dreame / MOVA | Modern wireless systems, often intricate gardens | Good orientation when the station and map match | For accessories, check the exact mounting and disc height; newer series have less long-term experience |
| eufy / Ecovacs | Camera-, vision- or RTK-based gardens with obstacles | Convenient app features, good object logic depending on the garden | Don’t confuse blade replacement with navigation issues; check the cutting image separately |
| Gardena / Husqvarna | Many classic wire installations, proven model families | Spare parts availability, known blade standards | Clean screw heads, check the correct blade thickness and pivot function |
| WORX Landroid / Vision | Small to medium-sized gardens, edges and narrow passages | Many accessory solutions, good repairability | For Vision variants, don’t mix up navigation and cutting system; check the blade mounting separately |
| TerraMow / Sunseeker / ANTHBOT | Newer wireless systems with less long-term experience | Interesting with wireless setup | Compare the type label, app variant and original mowing disc especially carefully |
The most important measurements are hole diameter, blade length, width, thickness, screw type, screw locking, distance to the disc, and housing clearance. With our CUT GUARD PETG mowing discs, we pay special attention to the fact that the stainless steel blades can swing freely when pre-assembled and do not rub against the disc due to being too close. This exact point comes up again and again in user reports: If an accessory or DIY disc is built just slightly too tight, plastic abrasion, grass fibers, or hard residue collect between the blade and the mowing disc.
Fit doesn’t just mean “the hole fits.” A robotic mower blade must sit securely with the correct screw, swing freely, and must not rub against the mowing disc or the housing.
Why blades must be able to swing freely—and what to do if they get stuck?
The small blades on robotic mowers are normally mounted so they can move. That’s intentional: they should yield when they hit obstacles and then realign themselves through rotation. If grass, resin, damp dirt, or hard residue gets in between, that no longer works. Many users then report a poorer cut, even though the cutting edge doesn’t seem completely dull to the touch yet.
Typical causes include mowing in wet grass, a very low cutting height, sandy ground, long mowing breaks followed by heavy overgrowth, or grass fibers that wrap between the blade and the mowing disc. With accessory discs, another factor applies: If the distance between the blade and the disc is too small, material abrasion can form or the blade can jam after just a few mowing cycles.
The solution is unglamorous but effective: clean the mowing disc regularly while dry, move the blades individually, check the screw seating, and remove any residue that has become stuck. No high-pressure cleaner extravaganza directly on the mowing deck, no aggressive solvents, and no force on the mowing disc. If a blade no longer frees up or the mounting is damaged, it is replaced.
Original, accessories, or 3D printing: opportunities and risks
Original parts have the advantage that the dimensions, screws, and clearances should fit the model. But they are not always cheap, not always immediately available, and they usually don’t offer an alternative blade count. Accessory solutions like CUT GUARD can make sense if they are cleanly designed, pre-assembled properly, and checked for clearance.
With compatible blades and discs, it’s important to be honest: not every third-party blade is automatically good just because it somehow fits onto the screw. Forums report issues such as thinner or narrower third-party blades, missing washers, missing screw locking, and unsafe clearance. If the blade flutters, jams, or sits too close to the mowing disc, you’re saving money in the wrong place.
With 3D-printed cutting discs, extra caution is required. For hobbyists, it can be exciting, but in real mowing operation, RPM, moisture, impacts, and imbalance put stress on the component. If plastic abrasion occurs, screws loosen, or the blades don’t swing cleanly, an experiment quickly turns into a safety problem.
Typical mistakes when changing blades
With a bit of practice, changing the blades often takes only a few minutes. Still, the same mistakes keep happening—especially when the screws are dirty or when you want to “just quickly” swap them.
- Only replacing individual blades: This can cause imbalance. Better to always replace all blades of a disc together.
- Reusing old screws without checking: Worn heads, damaged threads, or missing locking features increase the risk.
- Not cleaning the screw heads: Grass residue in the cross or Torx profile quickly leads to screws getting rounded off.
- Tightening the blades too much: The blade may then be “rock solid,” but it no longer swings freely.
- Using the wrong tool: A poorly fitting bit damages screws and makes the next replacement unnecessarily difficult.
- Ignoring damaged mounting points: If threads break out or the disc cracks, a blade change alone is no longer enough.
- Continuing to drive after a blade breaks: First check the disc, the housing, and all mounting points.
For stuck screws, patience helps more than force. Expose the screw head, apply the correctly fitting bit cleanly, build pressure straight in (perpendicular), and don’t turn it at an angle. If the screw head is already damaged, you shouldn’t keep turning for so long that the disc mounting point also suffers.
Step by step: Safely inspect the blades and cutting disc
- Stop and secure the robot: Switch off the device, follow the manufacturer’s safety instructions, and wear gloves.
- Clean the underside: Remove grass clippings from the disc, especially around the screws and blade mounts.
- Inspect the blades: Are notches, cracks, bent tips, or dull cutting edges visible?
- Test for clearance: Each blade must be able to pivot easily.
- Loosen the screws: Use the right tool and clean the screw heads beforehand.
- Replace all blades together: Use new blades and, if possible, new screws.
- Don’t pinch: Secure the blade properly, but allow it to move.
- Check the disc rotation: Nothing should scrape, wobble, or rub against the housing.
- Observe the test run: After the first mowing trips, check the cut pattern and listen for noises.
When a new cutting disc is installed, an additional step is required: before the first mowing, check by hand that all blades remain free throughout the entire pivoting range. This check is mandatory, especially for multi-blade discs.
Frequently asked questions
How often do I need to replace robotic mower blades?
Check the blades every 4 to 8 weeks and replace them if the cut pattern is poor, if there are notches, or if the blades are stuck. In tough gardens, 40 to 45 mowing hours may be enough; in clean gardens, blades often last significantly longer.
Are 6 blades better than 3 blades?
6 blades can provide a cleaner cutting pattern, especially on dense or fast-growing lawns. If the garden is simple and 3 fresh blades cut cleanly, the additional maintenance effort isn’t always worth it.
7 or 9 blades – which is better?
9 blades provide more cutting contact points; 7 blades can be a good compromise between cutting pattern and maintenance effort. The key factor isn’t just the number, but whether the disc fits the model exactly and the blades can swing freely.
Does every cutting disc fit every robotic lawnmower?
No, every cutting disc must fit exactly the model, mounting, screws, blade size, and housing clearance. Always check the nameplate, model generation, and the existing disc before installing accessories.
When do I need to replace the entire cutting disc?
The cutting disc must be replaced if it has cracks, imbalance, grinding marks, damaged threads, or unsafe blade mounts. With normal wear, usually replacing the blades and screws is sufficient.
Conclusion: The right cutting disc solves real cutting problems – but only with proper maintenance
A frayed, gray cutting pattern isn’t a mystery. Most of the time, it’s worth looking under the robotic lawnmower first: Are the blades sharp, able to move freely, and properly secured? Is the disc clean? Are the screws and mounts in good condition? Only then should you decide whether a different blade count or a new cutting disc makes sense.
For many gardens, 3 fresh blades are completely sufficient. With dense growth, short mowing windows, large areas, or an uneven cutting pattern, 6, 7, or 9 blades may be visibly helpful. However, the better cut must not be bought at the expense of poor fit, blades that jam, or damaged screws.
Anyone looking for a suitable solution for Segway Navimow, Mammotion, Dreame, MOVA, eufy, Ecovacs, Gardena, Husqvarna, WORX, TerraMow, Sunseeker, or ANTHBOT should not only buy based on the number of blades, but on model compatibility, clearance, and clean workmanship. A brand-spanning entry point is the overview for CUT GUARD cutting discs and accessories—matched to the respective robotic mower, not by guesswork.
Comments