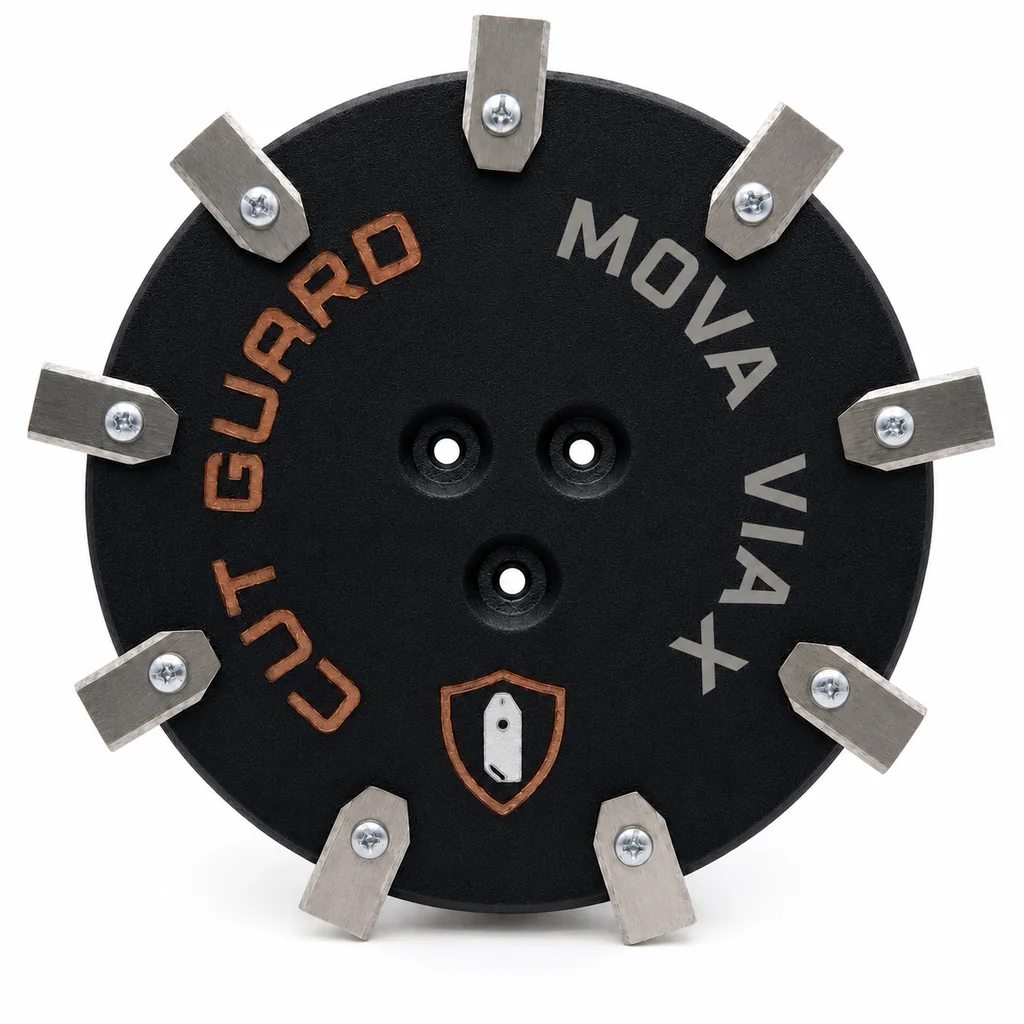
Klingen sind das billigste Verschleißteil an einem Mähroboter und dasjenige mit dem größten Einfluss auf das Ergebnis. Bei Mova reicht die Baureihe vom kompakten 600 für kleine Gärten bis zu den Lidax- und Viax-Modellen für große Flächen. Der Wechselvorgang ist überall derselbe. Was sich unterscheidet, ist das Intervall – und das hängt an der Fläche, nicht am Modellnamen.
Die zwei Bauteile, die ständig verwechselt werden
Wer im Netz nach Ersatzteilen für Mähroboter sucht, findet zwei Sorten Angebote nebeneinander: Klingen und Messerscheiben. Sie erfüllen unterschiedliche Aufgaben und haben völlig unterschiedliche Lebensdauern.
Die Klingen sind kleine Stahlplättchen von wenigen Zehntelmillimetern Dicke. Sie machen die eigentliche Arbeit. Jeder Halm, jedes Sandkorn, jeder Kontakt mit einem Kiesel trägt Material ab. Husqvarna und Gardena – Hersteller, die seit Jahrzehnten Wartungsintervalle veröffentlichen – nennen ein bis drei Monate Standzeit. Dieser Wert ist keine Marketingzahl, sondern folgt aus der Materialstärke. Er gilt für Mova genauso.
Die Messerscheibe ist der Teller darunter. Sie hält die Klingen in Position und überträgt die Drehbewegung des Mähmotors. Sie kommt mit dem Gras nur am Rand in Berührung und schneidet nichts. Deshalb verschleißt sie auch nicht im eigentlichen Sinn. Bei normalem Betrieb sind ein bis zwei Jahre eine zurückhaltende Schätzung, in vielen Gärten hält dieselbe Scheibe deutlich länger.
Die Konsequenz für Ihren Geldbeutel: Klingen kaufen Sie mehrmals pro Saison. Eine Scheibe kaufen Sie, wenn sie kaputt ist – nicht, wenn ein Kalenderblatt umschlägt.
Wann die Scheibe wirklich fällig ist
- Riss. Meist beginnt er an einer Schraubbohrung oder an der Außenkante. Eine gerissene Scheibe wird weiter aufreißen, weil die Fliehkraft in dieselbe Richtung zieht.
- Verzug. Legen Sie die abgenommene Scheibe auf eine Fliese oder Tischplatte. Sie muss plan aufliegen. Wippt sie, ist sie verformt und läuft unrund.
- Ausgeschlagene Bohrungen. Die Löcher sind oval statt rund. Die Klinge hat dann zu viel Spiel und schlägt gegen die Kante, statt sauber zu pendeln.
- Aufprall mit Folgen. Nach einem harten Treffer auf Wurzel, Randstein oder vergessenes Werkzeug: Sichtprüfung, auch wenn der Roboter weiterfährt.
Mova-Modelle und was beim Wechsel zu beachten ist
| Modell | Einsatzbereich | Klingen | Erwartetes Intervall |
|---|---|---|---|
| Mova 600 | kleine Gärten, eben | meist 6 | eher am oberen Ende, 2 bis 3 Monate |
| Mova 1000 | mittlere Flächen | meist 6 | 2 Monate als Richtwert |
| Mova Lidax (800 – 1600) | große Flächen, Lidar-Navigation | je nach Scheibenvariante | mehr Betriebsstunden, eher 6 bis 8 Wochen |
| Mova Viax (250 – 500) | kompakt bis mittel | je nach Scheibenvariante | nach Flächengröße, 2 bis 3 Monate |
Die Klingenzahl ist eine Eigenschaft der Scheibe, nicht des Roboters. Eine Sechser-Scheibe hat sechs Bohrungen – eine siebte Klinge lässt sich nicht dazuschrauben. Wer ein feineres Schnittbild will, tauscht die komplette Scheibe gegen eine Variante mit mehr Positionen und nimmt den etwas höheren Stromverbrauch in Kauf.
Vorbereitung: was Sie brauchen
- Arbeitshandschuhe, möglichst schnittfest
- Schraubendreher passend zum Klingenkopf – je nach Baujahr Kreuzschlitz oder Torx
- Bürste mit harten Borsten und einen Kunststoffspatel
- eine weiche Unterlage: Karton, alte Decke oder Rasen
- ein Gefäß für die alten Klingen
- den kompletten neuen Klingensatz, inklusive Schrauben, falls mitgeliefert
Was Sie nicht brauchen: einen Akkuschrauber. Das Drehmoment ist zu hoch und zu schlecht dosierbar. Die Schrauben werden von Hand angezogen.
Der Wechsel
- Gerät ausschalten, Sicherheitsschlüssel ziehen. Eine Pause über die App genügt nicht. Solange Strom am Mähmotor anliegt, arbeiten Sie nicht an den Klingen.
- Handschuhe an. Die Schneidkanten sind auch abgenutzt noch scharf genug für eine Schnittwunde.
- Umdrehen. Auf die weiche Unterlage legen, damit die Haube und – bei den Lidax-Modellen – die Sensorik keinen Schaden nimmt. Bei den großen Varianten hilft eine zweite Person.
- Unterseite reinigen. Bürste und Spatel. Getrocknetes Schnittgut sitzt vor allem im Spalt zwischen Scheibe und Gehäuse. Diese Kruste verteilt sich nie gleichmäßig und ist eine der häufigsten Unwucht-Ursachen überhaupt.
- Alte Klingen lösen. Alle, nicht nur die auffälligen. Beim Abnehmen jede Position im Blick behalten.
- Bohrungen und Schrauben prüfen. Rund oder oval? Schraubenkopf intakt? Wenn im Satz neue Schrauben enthalten sind, werden diese verwendet.
- Neue Klingen aufsetzen. Eine pro Position, keine doppelt.
- Handfest anziehen. Fest genug, dass sich nichts löst. Locker genug, dass die Klinge pendeln kann.
- Pendeltest. Jede Klinge einzeln mit dem Finger anstoßen. Sie muss sich um ihre Schraube drehen lassen. Klemmt sie, Schraube eine Vierteldrehung lösen.
- Scheibe drehen. Von Hand, langsam. Sie soll gleichmäßig laufen, ohne zu schleifen oder zu haken.
- Testlauf. Aufstellen, Schlüssel einsetzen, kurz mähen lassen – auf Rasen. Auf Pflaster hören Sie nur das normale Klappern.
Warum die Klingen wackeln dürfen
Neue Besitzer schrauben die Klingen oft zu fest, weil lose Teile an einer schnell drehenden Maschine falsch aussehen. Die Pendelaufhängung ist jedoch ein Sicherheitsmerkmal.
Trifft die Klinge auf einen Stein, eine Wurzel oder eine Schlauchkupplung, klappt sie nach hinten weg. Die Aufprallenergie wird in Bewegung umgesetzt statt in die Motorwelle geleitet. Eine starr verschraubte Klinge kann nicht ausweichen – dann trifft der volle Schlag Lager und Getriebe.
Dazu kommt bei Kunststoffscheiben ein zweites Risiko: zu fest angezogene Schrauben reißen das Gewinde aus. Dann ist die Scheibe hin, obwohl sie mechanisch heil war.
Der Nebeneffekt der losen Aufhängung ist das Klappern auf Beton und Pflaster. Die Klingen schlagen dort hörbar gegen den Teller. Das ist normal und verschwindet, sobald der Roboter wieder auf Gras fährt.
Erkennen, wann gewechselt werden muss
Der Blick auf den Halm
Eine scharfe Klinge trennt den Grashalm glatt durch. Eine stumpfe reißt ihn. Der gerissene Halm hat eine offene, zerfaserte Wunde, verliert dort Feuchtigkeit und trocknet an der Spitze aus. Die Farbe wechselt ins Graue oder Strohige.
Über die gesamte Rasenfläche gesehen entsteht ein matter Schleier, den viele für Trockenstress oder Pilzbefall halten. Die Prüfung dauert zehn Sekunden: einen Halm zwischen die Finger nehmen und die Schnittkante ansehen. Sauber quer abgeschnitten – alles gut. Ausgefranst – wechseln.
Die Akkulaufzeit
Stumpfe Klingen erhöhen den Schnittwiderstand. Der Mähmotor zieht mehr Strom. Braucht Ihr Mova für dieselbe Fläche plötzlich einen zusätzlichen Ladezyklus, ohne dass Gras oder Wetter sich geändert hätten, ist das ein Hinweis.
Der Saisonstart
Über den Winter setzen Klingen Flugrost an, vor allem wenn der Roboter feucht eingelagert wurde. Rost frisst an der Schneidkante. Unabhängig von den Betriebsstunden des Vorjahres ist der Frühjahrsstart ein guter Wechseltermin – schon deshalb, weil das Gerät ohnehin gereinigt und kontrolliert wird.
Fünf Fehler, die teuer werden können
1. Nur einzelne Klingen tauschen
Eine neue Klinge neben fünf verschlissenen wiegt mehr. Bei mehreren tausend Umdrehungen pro Minute reicht dieser Gewichtsunterschied für eine deutliche Unwucht. Die Folge ist ein Brummen und eine Dauerbelastung der Lager im Mähmotor. Der Satz wird komplett getauscht, auch wenn nur eine Klinge beschädigt aussieht.
2. Zwei Klingen auf einer Schraube
Husqvarna behandelt diesen Fall als eigenen Punkt in der Störungssuche. Beim Abschrauben bleibt eine alte Klinge hängen, die neue wird darübergesetzt. Von oben sieht der Stapel aus wie ein einzelnes Teil. Das Ergebnis ist ein hohes Summen, das oft mit einem Bienenschwarm verglichen wird. Nach dem Zusammenbau jede Position einzeln durchzählen.
3. Alte und neue Klingen mischen
Auch dann, wenn beide Sorten passen. Unterschiedliche Hersteller verwenden unterschiedliche Blechstärken, und schon wenige Gramm Differenz erzeugen Unwucht. Ein Satz kommt aus einer Packung.
4. Mit dem Hochdruckreiniger arbeiten
Der Strahl treibt Wasser an Wellendichtungen und Lagern vorbei. Der Schaden zeigt sich nicht am selben Tag, sondern Wochen später als rau laufendes Lager oder Korrosion an der Motorwelle. Bürste, Spatel, feuchtes Tuch. Bei hartnäckigen Resten einweichen, nicht spritzen.
5. Die Scheibe auf Verdacht mitkaufen
Kein technischer Fehler, aber unnötig. Prüfen Sie die vier Kriterien – Riss, Verzug, ausgeschlagene Bohrungen, Aufprallschaden. Trifft keines zu, bleibt die Scheibe am Gerät.
Häufige Fragen
Wie lange halten die Klingen beim Mova 600?
Bei kleiner, ebener Fläche liegt der Verschleiß am unteren Ende der Skala – zwei bis drei Monate sind realistisch. Ausschlaggebend sind die Betriebsstunden, nicht das Kalenderdatum. Ein Gerät, das täglich zwei Stunden läuft, verschleißt schneller als eines, das dreimal pro Woche eine Stunde arbeitet.
Brauchen die Lidax-Modelle häufiger neue Klingen?
In der Regel ja, aber nicht weil die Technik anders wäre. Sie decken größere Flächen ab und sammeln entsprechend mehr Betriebsstunden. Der Verschleiß hängt an geschnittenen Halmen.
Muss ich beim Klingenwechsel die Messerscheibe erneuern?
Nein. Sie ist der Träger und schneidet nicht. Solange sie plan aufliegt, keine Risse zeigt und die Bohrungen rund sind, bleibt sie drin. Ein bis zwei Jahre sind eine vorsichtige Annahme.
Mein Mova macht seit dem Wechsel ein hohes Brummen.
Drei Ursachen kommen infrage: eine Position mit zwei Klingen, eine unbesetzte Position, oder ein gemischter Satz aus alten und neuen Teilen. Gerät ausschalten, Schlüssel ziehen, umdrehen und alle Positionen einzeln nachzählen.
Passen Klingen anderer Marken auf einen Mova?
Entscheidend sind Lochbild, Bohrungsdurchmesser und Klingenlänge, nicht das Markenlogo. Wenn die Geometrie stimmt und die Klinge frei pendeln kann, passt sie. Wenn nicht, hilft auch Nachbohren nicht – eine vergrößerte Bohrung gibt der Klinge zu viel Spiel.
Kann ich von 6 auf 9 Klingen umsteigen?
Mit der passenden Scheibe ja. Neun Klingen erzeugen ein feineres Schnittbild, kosten aber mehr Akkulaufzeit, weil der Mähmotor gegen mehr Widerstand arbeitet. Bei einer Fläche an der Kapazitätsgrenze kann das einen zusätzlichen Durchgang bedeuten.
Sind die alten Klingen Restmüll?
Nein. Kleinteiliger Stahl gehört zum Wertstoffhof. Bis zur Entsorgung in einem geschlossenen Behälter aufbewahren – nicht offen liegen lassen und keinesfalls im Rasen vergessen.
Lohnt sich Nachschärfen?
Nicht bei diesen Klingen. Beim Schleifen tragen Sie an jedem Teil unterschiedlich viel Material ab, und das Ergebnis ist ein unwuchtiger Satz. Der Preis eines kompletten Klingensatzes liegt weit unter dem eines Mähmotorlagers.
Kommentare