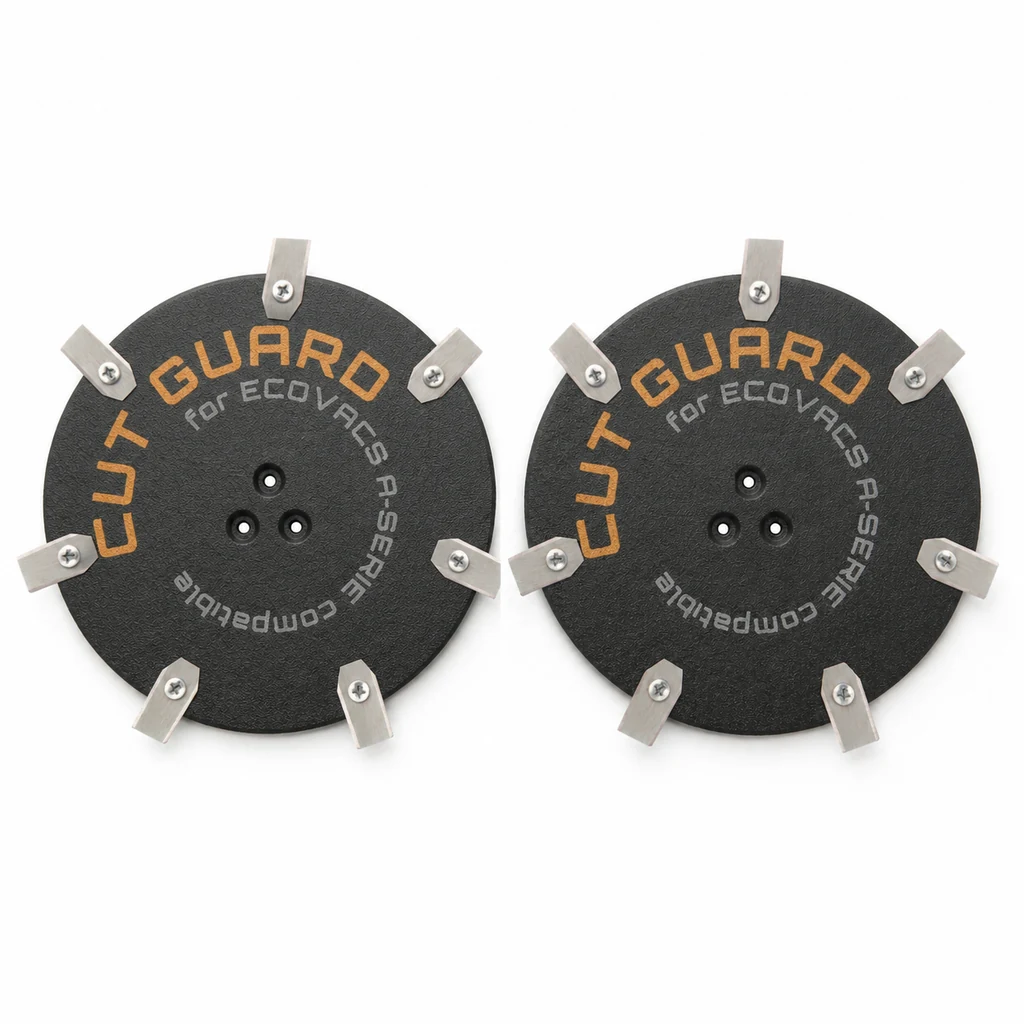
Ecovacs führt die Goat-Reihe in drei Linien: die O-Serie als Einstieg mit RTK-Navigation, das G1-Modell als etabliertes Mittelfeld und die A-Serie mit Lidar für große Flächen. Beim Mähwerk unterscheiden sie sich weniger, als die Preisspanne vermuten lässt. Überall dreht sich eine Scheibe, auf der einzeln verschraubte Klingen frei pendeln.
Der Klingenwechsel ist deshalb bei allen Goat-Modellen derselbe Handgriff. Interessanter als die Anleitung ist die Frage davor: Was muss überhaupt getauscht werden – und wann?
Zwei Teile, zwei völlig verschiedene Lebensdauern
Diese Unterscheidung spart im Lauf einer Saison mehr Geld als jeder Rabatt.
Die Klingen sind Verbrauchsmaterial. Federstahl von wenigen Zehntelmillimetern, der bei jeder Umdrehung Halme trennt und dabei Sand, Staub und gelegentlich einen Kiesel mitnimmt. Husqvarna und Gardena geben für ihre Geräte ein bis drei Monate an. Diese Zahl folgt aus der Materialstärke und gilt für die Goat-Klingen ebenso – Stahl weiß nicht, welches Logo auf der Haube klebt.
Die Messerscheibe ist der Träger. Sie hält die Klingen und überträgt das Drehmoment. Sie schneidet nicht, also nutzt sie sich auch nicht ab. Ein bis zwei Jahre sind eine konservative Annahme; in vielen Gärten läuft dieselbe Scheibe erheblich länger.
Sie hören und lesen an vielen Stellen die Empfehlung, die Scheibe alle drei Monate mitzutauschen. Dafür gibt es keinen technischen Grund. Die Scheibe wird ersetzt, wenn sie beschädigt ist:
| Befund | So prüfen Sie | Konsequenz |
|---|---|---|
| Riss | Sichtprüfung an Rand und Bohrungen, bei Gegenlicht | Scheibe ersetzen, Riss wächst durch Fliehkraft weiter |
| Verzug | abgenommen auf ebene Fliese legen | wippt sie, läuft sie unrund – ersetzen |
| Bohrungen oval | Klinge seitlich bewegen, Spiel beurteilen | Klingen schlagen statt zu pendeln – ersetzen |
| Gewinde ausgerissen | Schraube dreht durch, zieht nicht an | ersetzen, Klinge hält nicht sicher |
| alles unauffällig | – | Scheibe bleibt am Gerät, nur Klingen tauschen |
Die Goat-Serien und was das fürs Intervall bedeutet
Die Klingenzahl hängt an der montierten Scheibe, nicht an der Modellbezeichnung. Was sich zwischen den Serien tatsächlich unterscheidet, ist die Nutzungsintensität.
O-Serie (O500, O600, O800, O1000, O1200)
Kleine bis mittlere Flächen, RTK-Navigation. Die Geräte laufen typischerweise kürzer pro Tag und decken weniger Quadratmeter ab. Damit liegt das Klingenintervall eher am oberen Ende der Skala – zwei bis drei Monate sind bei durchschnittlicher Nutzung plausibel.
G1 (Goat G1, G1-800, G1-2000)
Das mittlere Segment mit Kameranavigation. Bei größeren Flächen steigen die Betriebsstunden, entsprechend sinkt das Intervall. Wer die obere Flächengrenze ausreizt, plant eher mit acht bis zehn Wochen.
A-Serie (A1600 Lidar Pro, A3000 Lidar Pro)
Große Flächen, längere Laufzeiten, oft anspruchsvolleres Gelände. Hier sammelt sich in wenigen Wochen die Laufleistung, für die ein kleines Modell ein Vierteljahr braucht. Sechs bis acht Wochen sind bei intensivem Einsatz keine Übervorsicht.
Der gemeinsame Nenner: Der Verschleiß hängt an geschnittenen Halmen und an der Menge Sand, die dabei mitläuft. Nicht am Datum und nicht am Kaufpreis des Roboters.
Der Wechsel
Rechnen Sie mit fünfzehn Minuten, beim ersten Mal etwas mehr.
- Ausschalten und Sicherheitsschlüssel ziehen. Eine App-Pause ist keine Abschaltung. Der Mähmotor muss stromlos sein, bevor Sie in den Klingenbereich fassen.
- Schnittfeste Handschuhe. Auch abgenutzte Klingen schneiden. Die meisten Verletzungen entstehen beim Abstützen am umgedrehten Gerät, nicht beim Schrauben.
- Auf weiche Unterlage umdrehen. Bei den Lidar-Modellen der A-Serie sitzt empfindliche Sensorik oben – Karton oder eine alte Decke ist hier kein Luxus.
- Unterseite reinigen. Bürste und Kunststoffspatel. Der Spalt zwischen Scheibe und Gehäuse sammelt feuchtes Schnittgut, das dort zu einer harten Schicht trocknet. Sie verteilt sich nie gleichmäßig und ist eine der häufigsten Unwucht-Ursachen.
- Alle Klingen abschrauben. Nicht nur die sichtbar beschädigten. Alte Teile in ein Gefäß, nicht in den Rasen.
- Aufnahmen kontrollieren. Bohrung rund? Schraubenkopf intakt? Gewinde greift? Liegen dem Satz neue Schrauben bei, werden diese verwendet.
- Neue Klingen setzen. Genau eine pro Position.
- Handfest anziehen. Ohne Akkuschrauber, ohne Hebelverlängerung.
- Pendeltest. Jede Klinge muss sich mit dem Finger um ihre Schraube drehen lassen.
- Scheibe von Hand durchdrehen. Gleichmäßig, ohne Schleifen oder Haken.
- Testlauf auf Rasen. Auf Pflaster klappern die Klingen ohnehin – dort hören Sie keine echte Unwucht.
Die Klingen müssen wackeln
Lose Teile an einer schnell drehenden Maschine wirken falsch, deshalb ziehen viele die Schrauben zu fest an. Die Pendelaufhängung ist aber Absicht.
Trifft der Roboter auf einen Stein oder eine Wurzel, klappt die Klinge nach hinten weg. Die Energie geht in die Bewegung, nicht in Motorwelle und Getriebe. Eine starr verschraubte Klinge kann nicht ausweichen – dann nimmt der Antrieb den vollen Schlag.
Bei Kunststoffscheiben kommt hinzu: Zu viel Drehmoment reißt das Gewinde aus. Die Scheibe ist dann unbrauchbar, obwohl sie mechanisch heil war.
Das Klappern auf Beton oder Terrassenplatten ist die direkte Folge dieser Konstruktion. Es ist kein Defekt und verschwindet auf Rasen.
Woran Sie stumpfe Klingen erkennen
An der Klinge selbst sehen Sie wenig. Der Materialabtrag beträgt Bruchteile eines Millimeters. Der Rasen zeigt es deutlicher.
Der graue Schleier
Eine scharfe Klinge trennt den Halm glatt. Eine stumpfe schlägt ihn ab und reißt dabei die Faser auf. Der Halm verliert an dieser offenen Stelle Feuchtigkeit und trocknet an der Spitze aus – er wird grau oder strohig. Über die Fläche gesehen liegt ein matter Schleier über dem Rasen, den viele für Trockenstress oder Pilz halten.
Prüfen Sie es am Einzelhalm: zwischen die Finger nehmen, Schnittkante ansehen. Glatt und quer ist in Ordnung. Zerfasert oder schräg gerissen heißt wechseln.
Der veränderte Stromverbrauch
Stumpfe Klingen erhöhen den Widerstand. Wenn der Goat für dieselbe Fläche plötzlich einen zusätzlichen Ladezyklus braucht und weder Wetter noch Graswuchs sich geändert haben, ist das ein brauchbarer Hinweis.
Der Frühjahrsstart
Klingen, die über den Winter am Gerät bleiben, setzen Flugrost an – besonders bei feuchter Einlagerung. Rost frisst die Schneidkante an. Der Saisonstart ist deshalb ein sinnvoller Wechseltermin, unabhängig von den Betriebsstunden des Vorjahres.
Typische Fehler
Einzelne Klingen tauschen
Der häufigste Fehler überhaupt. Eine neue Klinge neben fünf abgenutzten wiegt mehr, und bei mehreren tausend Umdrehungen pro Minute genügt das für eine spürbare Unwucht. Die Lager im Mähmotor tragen die Folgen. Immer als kompletter Satz wechseln, auch wenn nur ein Teil beschädigt aussieht.
Zwei Klingen auf einer Schraube
Husqvarna führt diesen Punkt eigens in der Fehlersuche. Eine alte Klinge bleibt beim Abschrauben hängen, die neue kommt darüber. Von oben sehen die gestapelten Teile aus wie eines. Das Resultat ist ein hohes Summen, das Besitzer oft mit einem Bienenschwarm vergleichen. Nach dem Zusammenbau jede Position einzeln nachzählen.
Klingen verschiedener Hersteller kombinieren
Unterschiedliche Blechstärken bedeuten unterschiedliche Gewichte. Auch wenn beide Sorten geometrisch passen, ergibt die Mischung Unwucht. Ein Satz kommt aus einer Packung.
Hochdruckreiniger
Der Strahl treibt Wasser an Wellendichtungen und Lagern vorbei. Der Schaden zeigt sich Wochen später als rau laufendes Lager. Bürste, Spatel, feuchtes Tuch. Hartnäckige Reste einweichen statt wegspritzen.
Zu früh nachbestellen
Kein technisches Problem, aber unnötige Ausgabe: Wer die Scheibe reflexhaft mitbestellt, kauft ein funktionierendes Teil doppelt. Die vier Prüfkriterien aus der Tabelle oben brauchen zwei Minuten.
Häufige Fragen
Wie oft muss ich die Klingen beim Goat O600 wechseln?
Bei kleiner bis mittlerer Fläche liegen zwei bis drei Monate im plausiblen Bereich – als Orientierung an den Herstellerangaben der Branche. Verlässlicher als der Kalender ist die Sichtprüfung an der Schnittkante der Halme.
Braucht der A3000 Lidar Pro häufiger neue Klingen?
In der Regel ja. Nicht wegen anderer Technik, sondern wegen der größeren Fläche und der längeren Laufzeiten. Der Verschleiß richtet sich nach geschnittenen Halmen, nicht nach dem Datum.
Muss die Messerscheibe regelmäßig mit erneuert werden?
Nein. Sie trägt die Klingen und schneidet selbst nicht. Solange sie plan aufliegt, rissfrei ist und die Bohrungen rund sind, bleibt sie am Gerät. Ein bis zwei Jahre sind eine zurückhaltende Annahme.
Mein Goat klappert auf der Terrasse – ist etwas kaputt?
Sehr wahrscheinlich nicht. Die Klingen hängen konstruktionsbedingt lose und schlagen auf hartem Untergrund gegen die Scheibe. Beunruhigend wird es erst, wenn das Geräusch auch auf Rasen auftritt und die Haube sichtbar vibriert.
Kann ich eine Scheibe mit mehr Klingen montieren?
Wenn die Aufnahme am Mähmotor passt, ja. Mehr Klingen ergeben ein feineres Schnittbild, kosten aber Akkulaufzeit, weil der Motor gegen größeren Widerstand arbeitet. Bei einer Fläche an der Kapazitätsgrenze kann das einen zusätzlichen Durchgang bedeuten.
Der Roboter brummt seit dem Wechsel.
Prüfen Sie in dieser Reihenfolge: doppelt belegte Position, leer gebliebene Position, gemischter Satz. Alle drei erzeugen dasselbe Geräusch und sind in wenigen Minuten behoben.
Kann man die Klingen schärfen?
Technisch ja, sinnvoll nein. Sie tragen an jeder Klinge unterschiedlich viel Material ab und erzeugen damit eine Unwucht, die Sie nicht sehen, die Lager aber schon. Der Wert eines Klingensatzes steht in keinem Verhältnis zu einem Motorschaden.
Wohin mit den alten Klingen?
Zum Wertstoffhof. Bis dahin in einem geschlossenen Behälter aufbewahren. Auf keinen Fall im Gras liegen lassen – die Teile sind klein, dunkel und scharf.
Kommentare